

Set gain manually between 60 and 85 percent depending on depth, run High CHIRP or 200 kHz for detail near bottom, and switch to 83 kHz when you need wider coverage. Set forward range to 80 to 100 feet, depth range to auto or 10 feet past your target depth, and troll at 1.0 to 1.5 MPH. Find the school, run lures 3 to 5 feet above it, and confirm depth on the downrigger ball or LiveScope before your first pass is even finished.
TL;DR:
- Adjust gain settings carefully using the false-bottom method to avoid clutter or faint marks in different depths, especially when water conditions change.
- Use 200 kHz or High CHIRP for structure near the bottom and switch to 83 kHz for broader water coverage; tuning gain is more impactful than auto modes.
- For forward-facing sonar, set the range at 80 to 100 feet and maintain low to medium noise rejection to detect kokanee schools reliably.
- Kokanee appear as tight, dense clusters or stacked arches, often vertically layered, in contrast to scattered marks of other fish species.
- Confirm lure depth relative to the school by watching the downrigger ball or LiveScope, positioning lures 3 to 5 feet above the targeted kokanee to optimize bites.
Table of Contents
- Quick Checklist for Kokanee Sonar Settings
- How Do Kokanee Show Up on Sonar?
- Setting Up Each Sonar Mode for Kokanee
- Where and How to Mount Your Transducer
- Using Sonar to Nail Lure Depth and Trolling Speed
- Common Sonar Problems and Quick Fixes
- A Field-Tested Sonar Setup From Nick
- Nick’s Take: What Actually Moves the Needle
- Sources
Quick Checklist for Kokanee Sonar Settings
Copy these numbers straight into your unit before you leave the dock. They’re starting points, not gospel, but they’ll get you fishing instead of fumbling with menus while marks scroll past.
2D/CHIRP base settings:
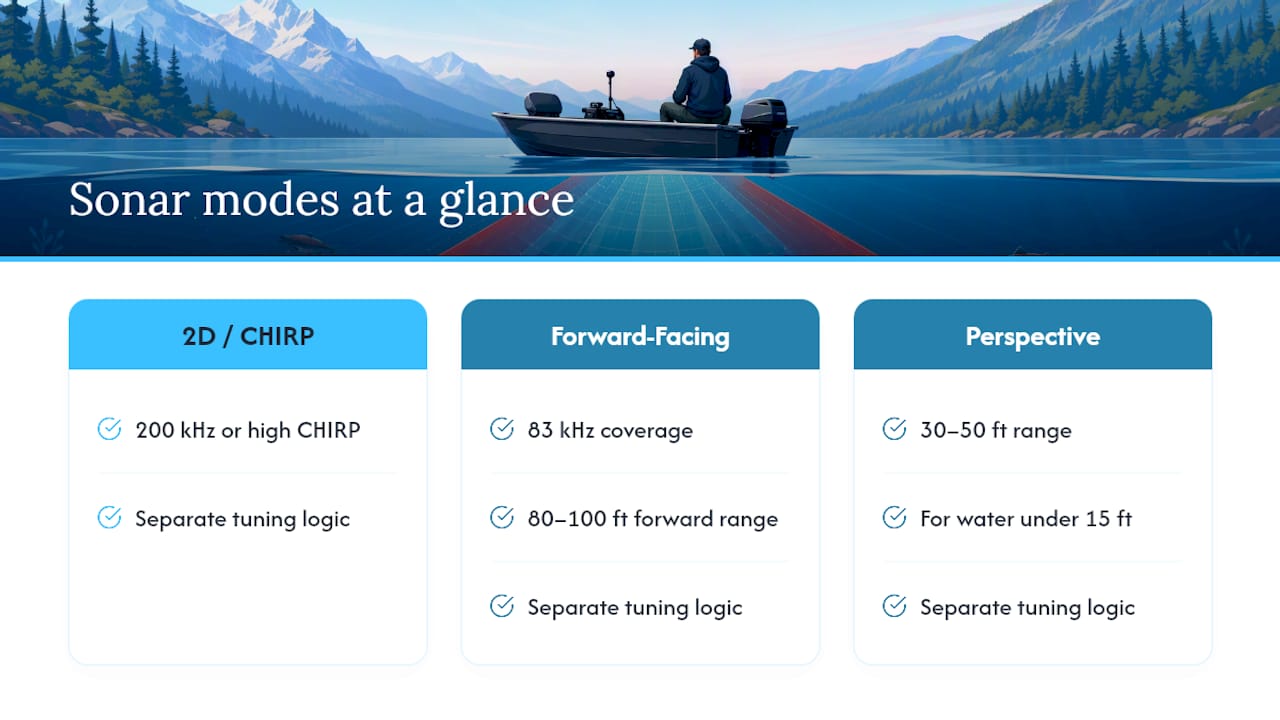
- Frequency: High CHIRP or 200 kHz for tight target separation near structure and bottom; switch to 83 kHz when you want a wider cone to sweep more water.
- Gain: start at 60 to 70 percent in water under 30 feet, push to 75 to 85 percent past 50 feet.
- TVG (time-variable gain): low or off. Kokanee marks are small, and heavy TVG washes them out.
- Scroll speed: medium. Too fast and you lose mark history; too slow and you miss fresh returns.
Forward-facing / LiveScope:
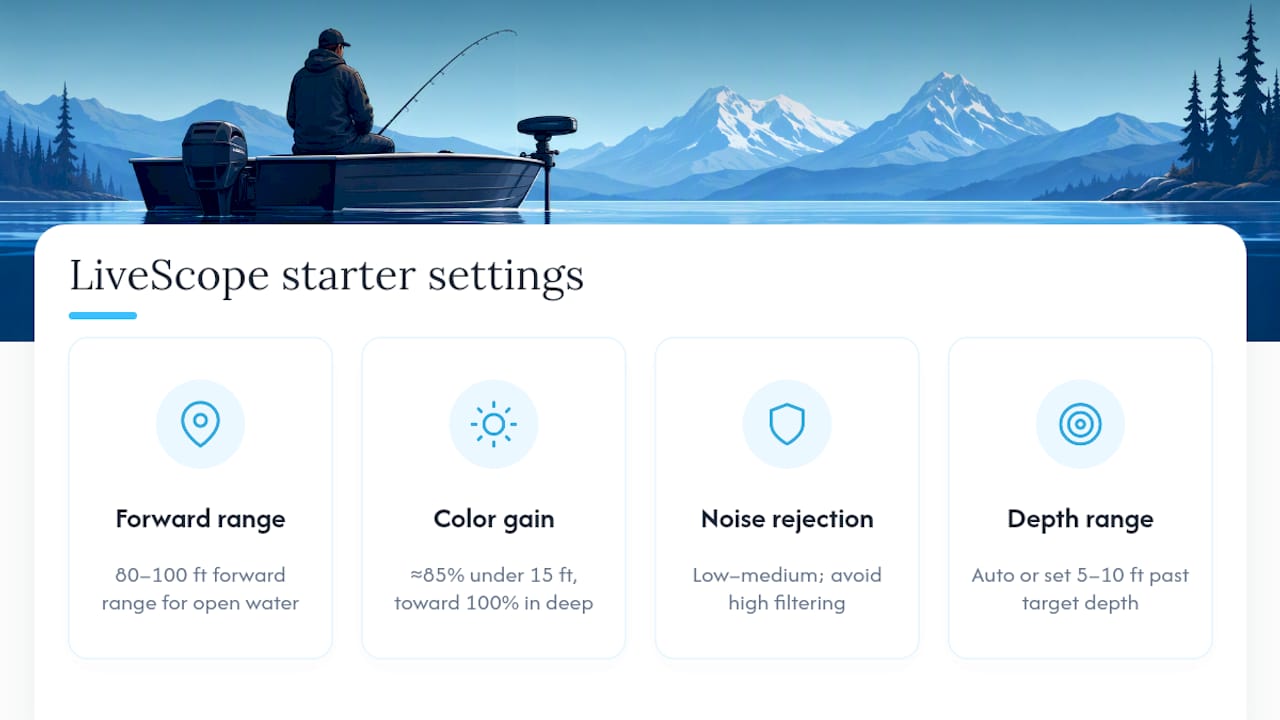
- Forward range: 80 to 100 feet for open water trolling.
- Color gain: 85 percent in shallow water (under 15 feet), climbing to 100 percent as depth increases.
- Noise rejection: low to medium. Cranking it higher erases the faint returns that separate kokanee from clutter.
Perspective / down or side-scan:
- Distance: 30 to 50 feet, best suited for water shallower than 15 feet.
- Palette: pick one with clear shading steps, like Blue or Black Emerald, so weak and strong returns don’t blend together.
Depth range and speed:
- Set depth range to auto, or manually 5 to 10 feet past your target depth.
- Start trolling at 1.0 to 1.5 MPH, then confirm lure depth against the school before adjusting speed further.
How Do Kokanee Show Up on Sonar?
Kokanee have unusually large swim bladders for their body size, and that makes them highly reflective. On a screen, they don’t look like scattered dots. They show up as tight, dense clusters or stacked arches, often bunched so close together that individual fish blur into a single blob of color.
That density is the tell. A lone trout or a random batfish ball reads as scattered, thin marks. A kokanee school reads as a compact, layered wall, sometimes stretching vertically for 10 to 20 feet if the fish are actively feeding through the water column.
A few identification cues worth memorizing:
- Tight clusters, not scattered dots: kokanee schools hold close together, especially in open water away from structure.
- Stacked layers: heavy stacking often means an actively feeding school, not just fish passing through.
- Consistent depth band: kokanee tend to hold in a narrow depth range tied to water temperature, so marks repeat at similar depths pass after pass.
- Skittish behavior: schools often move off the boat’s path, which is why a school that reads thick on one pass can look thin on the next.
Pro Tip: If your school keeps disappearing outside the 2D cone, widen your beam coverage or switch to side-scan rather than assuming the fish left the area. They probably just shifted a few feet off your line.
Kokanee typically hold in 50 to 59°F water, which means their depth shifts as a lake stratifies through the season. Early season, they might sit shallow. By midsummer, they’re usually stacked at or just above the thermocline, and that band is exactly where your sonar attention should live.
Setting Up Each Sonar Mode for Kokanee
Different sonar modes ask for different tuning logic. Treat 2D/CHIRP, forward-facing, and perspective as three separate tools, each with its own dial-in process, rather than one setting you copy across all three.
2D and CHIRP: the foundation everyone should master first
Frequency choice comes down to what you’re trying to see. High CHIRP or 200 kHz gives you the tightest target separation, which matters when kokanee are stacked close to the bottom or holding near structure. Drop to 83 kHz when you’re sweeping open water and want a wider cone to find schools faster, accepting slightly less detail in exchange for coverage.
Gain is the setting that makes or breaks your picture, and it’s worth doing manually rather than trusting auto mode. Sensitivity is widely considered the single most important sonar adjustment: raise it in deep water to pull in faint returns, and pull it back in shallow water so the screen doesn’t fill with noise.
Here’s the tuning sequence that actually works on the water:
- Run the false-bottom method. Set your manual depth range to roughly double your actual water depth, then adjust gain until a faint secondary echo (a “false bottom”) appears just below the real bottom line.
- Back off slightly. Once that false bottom shows up clearly, dial gain down 5 to 10 percent. You’ve now locked in a setting sensitive enough to catch faint kokanee marks without drowning the screen in clutter.
- Re-check every time depth changes significantly. Moving from 30 feet to 80 feet of water without adjusting gain is the single most common mistake anglers make.
TVG should stay low or off for kokanee work most of the time. This setting automatically boosts gain at greater depths to normalize the picture, but kokanee marks are already small and easy to lose. Heavy TVG smooths them right out of existence.
Scroll speed matters more than most anglers realize. Set it too fast and you lose the ability to see how a school has developed over the last few passes. Set it too slow and fresh returns take forever to populate. Medium speed is the right call for most trolling situations.
Color palette is a matter of separation, not preference. A palette with clear shading steps, like Blue or Black Emerald, helps you read return strength directly instead of guessing whether a mark is a fish or noise.
Forward-facing and LiveScope: hunting instead of guessing
This is where kokanee fishing changed the most in the last several years. Live-scanning sonar lets you watch your lure and the fish in the same frame, in real time, which turns trolling from a blind presentation into something closer to active hunting.
Start with forward range at 80 to 100 feet for average casts in open water. That range gives you enough lead time to spot a school and adjust your approach before you’re on top of it, without pushing the range so far that returns get faint and hard to interpret.
Color gain should sit around 85 percent in shallow water, under 15 feet, climbing toward 100 percent as depth increases. Kokanee marks lose brightness fast at range, and under-gaining in deep water is how anglers miss schools that are right in front of them.
Noise rejection wants to stay low to medium. Push it too high and you’ll clean up the screen, but you’ll also erase the faint, small returns that distinguish a scattered kokanee school from open water. This is a setting where less aggressive filtering almost always produces better fish-finding results.
Depth range works best on auto, or set manually 5 to 10 feet past your target depth so you’re not wasting screen space on water you don’t care about.
Pro Tip: Don’t fight your unit’s stabilization (AHRS) settings in rough water. Leave it on when there’s chop bouncing your boat around, since it keeps the sonar picture steady even when the hull isn’t. Turn it off only in dead calm conditions where you want the raw, unprocessed view.
Perspective mode: the shallow-water specialist
Perspective mode, sometimes called down-mode on forward-facing units, is built for shallower water and closer ranges. It shines under 15 feet of depth, where a 30 to 50 foot distance setting gives you a clean, detailed picture of what’s directly below and around the boat.
Choosing between perspective and forward mode isn’t complicated once you know the depth cutoff. Shallow water, tight quarters, or fish holding close to the boat call for perspective. Open water trolling at typical kokanee depths, usually 20 feet and deeper, calls for forward mode and its longer range.
One mistake shows up constantly: anglers run forward mode’s long-range settings in shallow water, and the picture condenses everything into a blurry mess near the top of the screen. Matching your distance setting to your actual depth and target range prevents that blur and keeps individual marks separated instead of smeared together.
Where and How to Mount Your Transducer
Your settings only matter if the transducer feeding them data is mounted correctly. Get this wrong and every gain adjustment in the world won’t fix a distorted picture.
A dedicated shaft mount works best if you’re running forward mode exclusively, since it holds a fixed angle that’s already optimized for long-range forward viewing. If you switch between perspective and forward modes depending on depth and conditions, a universal shaft mount gives you the flexibility to adjust angle without swapping hardware mid-trip.
Mount height and angle directly affect what you see on screen, and small errors compound fast:
- Too high above the waterline introduces air interference and weak returns, especially at trolling speed.
- Wrong angle shows up as a false or doubled depth reading, since the transducer is reading a slanted path to the bottom instead of a straight one.
- Loose or vibrating mounts create scattered noise across the entire screen, mimicking the clutter anglers often mistake for bad water conditions.
Check your angle by comparing your sonar’s reported depth against a known reference, like a marked downrigger cable at a set depth. If the numbers don’t match, adjust the mount angle before touching a single setting on the unit itself.
Range settings tie back to mounting because they determine how much of that transducer’s field of view you’re actually using. Perspective mode’s 30 to 50 foot range suits shallow water under 15 feet, while forward mode’s 80 to 100 foot range handles typical kokanee depths past 20 feet. Running a mismatched range for your depth is one of the fastest ways to introduce condensation and blur into an otherwise clean picture.
Using Sonar to Nail Lure Depth and Trolling Speed
Everything up to this point has been about getting a clean picture. This part is about turning that picture into bites.
Kokanee stack near the thermocline because that’s where water temperature sits in their preferred range. Watch your sonar as you cross depth contours, and you’ll often see a visible band where marks concentrate, sometimes with a faint temperature-driven layer visible on the display itself. That band is your target zone, not the bottom, and not the surface.
The presentation rule that shows up across nearly every credible kokanee resource is simple: run your lures 3 to 5 feet above the marked school. Kokanee feed upward more readily than downward, and a lure sitting at or below the fish’s level gets ignored far more often than one hovering just overhead.
Here’s the sequence for dialing in depth and speed once you’ve found fish:
- Mark the school’s depth on screen, then set your downrigger or lead core to place the lure 3 to 5 feet shallower.
- Confirm the placement. Downrigger balls are typically easy to spot on sonar, so watch for the ball’s mark relative to the fish before committing to a full pass. If you’re running LiveScope, you can watch the lure itself track relative to the school in real time.
- Start trolling at 1.0 to 1.5 MPH, then adjust in small 0.1 to 0.2 MPH increments. Kokanee are notoriously speed-sensitive, and a change that feels tiny on your GPS can be the difference between a dead rod and a screaming reel.
- Watch how the school reacts to your pass. If marks scatter as the boat approaches, you’re either too loud, too fast, or too shallow relative to the fish. Back off speed slightly and widen your approach angle on the next pass.
Positioning matters as much as speed. A straight pass-through works when the school is spread out and holding steady. When you find a tight, stacked group that isn’t spreading, stationing over it and working a slow figure-eight pattern often outproduces repeated straight passes, since it keeps your lures in the strike zone longer without repeatedly spooking the same fish.
Pro Tip: If a school keeps diving the moment your boat gets close, you’re probably running too shallow for the conditions. Kokanee spook from surface noise more than most anglers expect, especially in calm, clear water. Add a touch of downrigger depth and slow down before assuming the fish just weren’t biting.
Currents complicate all of this, which is exactly why LiveScope earns its reputation for correcting depth errors that GPS-based trolling apps can’t catch. A lure that should sit at 35 feet based on your downrigger counter can easily be riding at 28 feet in a strong current, and you’d never know without a live view confirming actual position. When that mismatch shows up, shorten your leader spacing or add weight rather than fighting it with speed alone. Our dodger spacing guide covers how leader length changes lure behavior under load if you want to dig deeper into that adjustment.
Common Sonar Problems and Quick Fixes
Even a properly tuned unit throws curveballs. Most kokanee sonar frustration traces back to a handful of repeat offenders, and every one of them has a fast fix.
- Screen full of clutter, no clear marks: gain is set too high for the depth. Run the false-bottom method again and back off 5 to 10 percent.
- Faint or missing marks in deep water: gain is too low. Increase sensitivity gradually until faint returns start showing up without flooding the screen.
- Marks blur together and won’t separate: switch color palettes to one with more defined shading steps, and check that TVG isn’t set too aggressive for the depth you’re fishing.
- False or doubled depth reading: check transducer mounting angle first. A tilted mount reads a slanted path to bottom instead of a true vertical one.
- Random noise streaks across the screen: inspect transducer wiring and grounding, and check for motor or electrical interference, especially at higher trolling speeds.
- Lure riding shallower than expected: current is likely pulling it up. Shorten leader spacing, add downrigger weight, or verify actual position with LiveScope rather than trusting the counter alone.
Most of these fixes take under a minute once you know what to look for, which is the real advantage of understanding your settings instead of just accepting whatever the unit defaults to out of the box.
A Field-Tested Sonar Setup From Nick
Every setting above works better once you see how they come together on an actual trip. Here’s a setup that’s produced consistent hookups across multiple outings targeting stacked kokanee in open water:
- Mode: Forward-facing, switched to perspective only when working structure shallower than 15 feet.
- Forward range: 90 feet, splitting the difference in the 80 to 100 foot range for most conditions encountered.
- Manual gain: 65 percent in water under 30 feet, bumped to 80 percent past 50 feet.
- Color gain: 90 percent as a baseline, adjusted up near 100 percent in deeper basins.
- TVG: off. Kokanee marks are too small to risk washing out.
- Depth range: auto, letting the unit track bottom changes without manual re-entry every few minutes.
- Starting trolling speed: 1.2 MPH, fine-tuned in 0.1 MPH steps based on how marks reacted to each pass.
The real work happens watching downrigger releases against the sonar screen. Small spacing adjustments, sometimes just a few feet between leaders, changed how lures tracked relative to stacked schools. Tightening spacing when fish held in a narrow band, and widening it when a school was spread vertically, made the difference between a rod that stayed quiet and one that loaded up within a few passes.
The single biggest shift wasn’t a fancier setting. It was watching the downrigger ball relative to the marked school instead of just trusting a depth counter. Once that became routine, missed strike zones nearly disappeared.
Anglers looking to round out the presentation side should check the downrigger release setup guide for tuning tension and drop timing, and the scent bait tips post for pairing sonar-confirmed depth with bait that actually gets bit.
Nick’s Take: What Actually Moves the Needle
Most sonar advice treats every setting as equally important, and that’s backwards. Gain tuning through the false-bottom method matters more than any other single adjustment, because a poorly gained unit makes every other setting irrelevant. You can have perfect forward range and ideal color gain, and still miss fish if gain is fighting you.
The conventional wisdom oversells forward-facing sonar as a magic fix. It’s a genuine advantage for watching lure-to-fish relationships, but it doesn’t replace understanding how kokanee actually behave near the thermocline. Anglers who chase gadget settings while ignoring water temperature and school depth still get skunked, just with a fancier screen showing them why.
If you take one thing from this guide, prioritize the 3 to 5 foot rule above the school and confirm it visually every single pass. Everything else, frequency choice, palette, forward range, exists to support that one habit.
— Nick
Sources
The technical claims in this guide draw from a mix of agency fisheries guidance and dedicated sonar and kokanee resources:
- Understanding Basic Sonar Settings — Mercury Marine
- How to Catch Kokanee Salmon: The Complete Guide — Kokanee Krew
- How modern sonar works — West Marine
- FG staff gives kokanee fishing tips — Idaho Fish and Game
For gear that pairs with these tactics, browse High Class Tackle Co.'s terminal tackle and components.
0 comments